Wednesday, 8 February 2012

How to use a thimble

Do you or don't you?  Use a thimble that is...


I didn't used to, but now I can't sew without one.  I've tried over the years to use a thimble because it looks sensible and 'professional' and frankly, I think it looks grown up - but try as I might, every time I put one on, I felt like I had grown at least 2 more fingers which felt horribly cumbersome and clumsy and made any sort of hand stitching physically impossible - talk about being 'all fingers and thumbs'!

The trouble is, that when sewing corsets it's really difficult to stitch certain parts and embellishments without severe injury and so I had to find a way to protect my poor punctured fingers!   Learning to use a thimble was the only option.  After searching in vain for information on how to do this, I thought i'd write my own guide..

An adjustable thimble which allows for long nails!
First of all, you need to find a thimble that fits properly. Thimbles come in different shapes and sizes, some without tops, some without sides, plastic or metal, adjustable -  others have ridges on the top, some are smooth or rounded and some are made of leather.  You can even get 'thimbles' which are nothing more than a metal or plastic disc which you glue onto the pads of vulnerable fingers.

Despite the huge array of choice much of which I have sampled in my quest to find a thimble which is effortless and easy to sew with, in the end, none of them did the job better than the traditional full metal thimble.  Yes the 'topless' ones look tempting don't they? I have tried the ones in the picture and the 'adjustable' plastic type which has one side missing making it look as if it may be un-noticable to use,  but none of them offer full protection - any finger exposure is at risk of stray needle peforation danger!

There was no option in the end - I had to get to grips with the traditional thimble, and once I'd figured out that size matters this job became a whole lot easier.   I found one made by Prymm, which is 14mm and the perfect size for my middle finger.

Don't buy a thimble unless you can try it on first or already know your size.

A thimble is commonly worn on your middle finger, and needs to be very snug - not so snug that you have to force it on, or feel uncomfortable, but so that it doesn't slip off if you hold your finger upside down.  If your fingers are cold, it may be difficult to hold a normally well fitting thimble on, in which case breath a little steam into the thimble before putting it on (in manner of cleaning a pair of glasses).

Now is the difficult part.  Sewing with a thimble requires you to adjust your hand posture when stitching - this is the key.

You have to bend your middle finger (with the thimble on) into a position so that it rests behind the needle when the needle is pushed into the fabric.  I found this blog post quite helpful in explaining this, although I'm not using a tailors thimble, the posture is similar.

Very difficult to photograph oneself using a thimble!
So you hold the needle between thumb and forefinger (as usual) when you insert the needle into the fabric but your middle finger rests behind the needle and pushes the needle into the fabric after the initial stab.  The eye of the needle comes into contact with the side of the thimble during this action, and if you need a little more force, you can then easily manoeuvre your finger to push the needle further with the end of the thimble which in my case, has a little ridge around the top to stop slippage.

And there you have it .. it takes a few sessions to get into the swing, but I found that not only did my hands not hurt from strain so much when hand sewing - infact they don't hurt at all anymore - it has now become a pleasure to put my thimble on before stitching and unexpectedly,  impossible to sew without one.

So does this tempt you to try thimbling where you'd been put off before?

Monday, 30 January 2012

A green fairtrade upcycled corset


Thanks for all your lovely comments on the last post :)


I thought I'd show you the finished article!

This longline corset is made from fair trade vietnamese silk which is a beautiful lime/pea green colour shot with yellow - it gives a kind of 'beetlewing' effect .. although together with the weave of the fabric, close up, it reminds me of flies eyeballs (!) - it has the most amazing array of colour depending on the light.


The silk comes from a small co-operative business in Vietnam .. it's a bit of a long story as to how I came to have some so I'll give you the short version:-   A lady  who was a journalist, visited some out of the way places in Thailand and Vietnam.  While there she discovered independent co-operatives weaving silk and fell in love with the beautiful fabrics they were producing, so much so that she decided to leave journalism, buy a ton of silk direct from the makers, and open a shop here in Oxfordshire, which she ran quite successfully for some years.  The shop was aptly called "Silken Dalliance".  Well about 18 months ago, she had to close her shop and has been selling her left over stock via various other channels in Oxford.


My next project will use some silk from the same source but blue shot with grey, silver trims and more intricate flossing.  I'll keep you posted.

Meanwhile, my next post will mostly be about thimbles.


Wednesday, 25 January 2012

Bra recycling

I had this bra which didn't fit, but it had lovely lace details....


so I cut it up and saved the bits ...

 The straps, fastenings and underwires will eventually make another bra.  With the lacy bits, I decorated a corset...


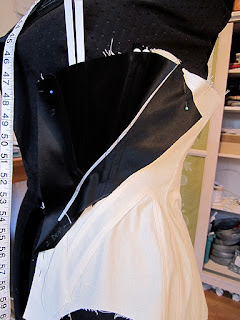
The corset is especially made for the mannequin which came from Lucy.  I love how the bottom of the corset makes a pretty petal shape when fanned out like this ...


I have animal friends to help me!  A magnetised pin whale, and stork scissors..


I'm now inclined to look in charity shops for discarded bras with pretty lacy bits ...

Friday, 20 January 2012

Corsetry and dressmaking

Lordy, I just don't know how I manage to fill up my time so!!  Things on my table already for this year which I will be telling you about in due course ...

Corset making -  I am furiously sewing up show pieces for my new website.  The new designs have to be tested on a real person to ensure fit, proportion and line - the difficult part of this is finding a person with very 'average' measurements so that my fitting can be refined and further designs draped in a way that I know will fit real people.

flossing detail of a longline silk overbust corset with external bone casing
Dressmaking - I'm signed up to teach basic dressmaking over a 7 week evening course starting in May at the local sewing shop.   Working from home means I don't get out much and this chosen work means that even if I did get out, there aren't that many interested in what I do.  So teaching enthusiastic newbies the basics of dressmaking is good.  I've been asked to think of other courses in the line of lingerie and corsetry which could be held here so all is very exciting on that front.

Commissions - A friend from Edinburgh has seen a dress in a vintage shop that she wants me to copy.  She would have bought the original dress but it didn't fit - she is breast feeding, and will be for a while -  so not only does she need extra room up there, but she needs the dress to be altered when she stops.  The shop keeper was more than happy to let her take pics of details to send to me for replication so I am very happy to do this.

Details of the vintage dress
It's a beautiful dress.  Black wool crepe shift with cap sleeves, boatneck and a silk frill at the bottom with some beading and fringing details.  All of the materials we have bought - silk and wool crepe - are fair trade/organic/recyled/ethical which makes this project all the more lovely.  I've been concentrating on corsetry so much over the last year that I haven't made a dress for an age and this one is a lovely little commission -  a simple, classic, elegant design.  Ofcourse made with modern materials and with my own design details included it wont be an EXACT copy but one that will be utterly personal to my friend and hopefully treasured for a very long time.  Perhaps even in 70 years time, it will be admired in a shop window as a lovely vintage piece in it's own right.  We can dream eh?

I also have a ton of silk underwear projects to get through, some for my friend with the dress (above) and some for my mother in law - it's all compatible with my new line that I'll be showcasing over at my other website.

And as if that isn't enough (and it really isn't all), I really have to make some dresses for myself.  My weight has been fluctuating over the last 2 years but I've finally got a grip on the reasons for this and what to do about it!  Basically, as you get older, you can't eat chocolate and other 'rubbish' .. so it's new diet, new year, new wardrobe, new career ... I can't wait for 2012 to happen!

Monday, 21 November 2011

Complicated corsetry - antique patterns

I've been immersed in some complicated corsetry - setting myself challenges and working out designs.   This is a very beautiful Edwardian corset pattern from Atelier Sylphe.  You can tell it's Edwardian just by the beautiful swooping seams and gussets which are characteristic of this era.

One way to take your corsetry to the next level, is to sew as many historical patterns as possible.  I've got a stack to get through, some from old patents, some scaled up from books and some drawn by corsetiers who own antiques, such as this one from Atelier Sylphe.  This pattern is from the period c.1902-1905 and therefore an early Edwardian corset -  my favourite style because of the curved seams, flat front and beautiful hip shaping of that era.

Atelier Sylphe
Atelier Sylphe patterns come with some very basic instructions and a ton of pictures supplied electronically detailing every seam, every angle, every minute detail of the original antique corset, so that the experienced corset maker can figure out how to sew it together.  It's not as hard as it sounds once you get down to it, but I found that pinning the paper pattern complete with bone channel guidelines together first, acts as a great reference and guide to sewing the toile - you can make notes on it as you go so that you have a 'live' reference when you come to sew the final version.


Edwardian corsets are generally single layer garments with curved lapped seams, bust and hip gussets, and vertical bone channels sewn to the inside over the curved construction seams.


I made one calico toile, sewing each side together separately and making improvements each time.  I then collected some coutil scraps and made a section of the pattern to see how the design reacted to much stiffer fabric, and added a little piping experiment.  Quite happy with the results I cut the corset in coutil and made up one side with silver piping at the main curved seams.


Black satin coutil is extremely unforgiving - it shows up every single tiny mark, every pin prick, every crease, and to make matters worse, it is a devil to stitch - the glare of the shiny surface with black stitching is an eyeache.  

However, the result is extremely pleasing, and although hard on the eyes when stitching, satin coutil is very easy to sew and gives the corset a lovely crisp appearance and feel with a really beautiful lustre.


The piping is polyester - all I had in the correct colour.  I'm not convinced.  Will have to try silk fabric for the piping - it's thicker than polyester so the 'rope' pattern of the piping cord wont show through, and it will be less slippy to sew.  However the other reason i'm not sure about the piping is because of the way the boning channels must be sewn perpendicular to the curved seams and therefore over the piping at an almost 45 degree angle.  It might therefore be better to construct the corset in a different way which means that the vertical bone channels are sewn invisibly to a lining.


I do love this pattern.  The way it has been drafted is excellent - every line perfectly matched so that the corset, once you have worked it out, is actually really easy to sew.  The detail is fabulous, the shape lovely.     I'm going to sew the other side in a different style - closer to the original, without piping but with contrast stitching.

My blog posts will be quite intermittent over the next few weeks but I will keep you posted, and I do have a little giveaway to tell you about soon.


Friday, 4 November 2011

A little rant

This week on my Sew Curvy Facebook page, I wrote a 'status update' which I thought may be of interest to readers here too.  So I have expanded upon it a little and added a video to demonstrate the problem.

The corset on the left is by Electra Designs, the one on the right is a cheap chinese rip off.  See what corsetiere Alexis Black had to say about it on her Facebook page by clicking here.
Corset design and image theft is a big problem in the independent corsetiers world.  Individuals are constantly finding that their hard work has been ripped off and copied by unscrupulous Chinese factories, and to add insult to injury the images which they have worked hard to create and probably paid a lot of money for, are used to promote these knock-off's at ridiculous prices.

From time to time, these big companies from China offer me wholesale corsets at knock down prices. USD5.00 each to be precise. Yes $5 for a corset.

This means that the manufacturing cost of these corsets is under $2.50 which works out at about GBP2.00 and €1.50. 


If that's how much it costs to manufacture a corset in China, can you then imagine the cost of the raw material - the busk, the bones, the fabric, eyelets and the lacing plus any embellishments? Perhaps we're talking $1.50? Which leaves less than $1 per corset for the people working in the factory!

These corsets retail in the West under brands such as "Corsets UK" and other similar sites,  for between £30-100 (€40-120/$50-150).  That's a heck of a mark up!

As I said, often the designs are copied from hard working independent corsetiers. The resulting fake product is not only cheap and nasty - literally, but the fit is ...well there isn't a fit. 

Corset busks from Germany
German steel is the best steel in the world, closely followed by British steel.  Most professionals use German steel busks in their corsets.  If you consider that one German steel busk fastner is more expensive wholesale than the cost of a whole corset made in China, you can easily see the reason why it's best to either make your own corset with quality supplies, or buy a bespoke or rtw corset from a reputable and independent corsetiere.  Infact, the cost of making a quality corset can quickly add up to £50+ for the raw materials depending on fabrics used.  The money you pay for a bespoke corset is made up of this cost plus the extreme care, attention, and time lavished on each piece by it's maker.  A plain corset can take 20 and more hours to make.


Once, I had a corset for sale in a shop where I happened to be working when a couple took an interest in the peice.  They saw the price tag of £200 and dropped it with a nervous giggle and a look which said "whoever made that is having a laugh".  I didn't say anything but I was aflame with indignation!  If I was paid just £10 an hour for the length of time it took me to make the corset - not including the cost of materials, it would have cost much more!  When you think that a good hairdresser is paid up to £50-60 an hour for their work, then please tell me why an equally skilled artisan is worth less per hour just becuase their work involves a needle and thread?

In corsetry, and other sewing related artistry,  you really do get what you pay for so here's a little film from Lulu and Lush to demonstrate what I mean.


And to all ladies who sew - we must never underestimate or undervalue our skill and the care and patience it takes to produce beautiful things with it.


Sunday, 9 October 2011

Corsets on the table


Furiously trying to finish my book in time for the November deadline.  I'm nearly there but finding it very hard to keep it simple and understandable for beginners, and yet inspirational for intermediates.  

Here is a double layered silk corset which is one of the corsets featured in the book, proudly modelled by one of Lucy's gorgeous girls.

This is what the boning looks like if you could see it
The next project for the book will be the same shape but using a different technique with different fabrics and embellisments.

Also on the table, I'll be making a corset for a friend soon, here are the ideas i've been playing with in scraps..