Monday, 21 November 2011

Complicated corsetry - antique patterns

I've been immersed in some complicated corsetry - setting myself challenges and working out designs.   This is a very beautiful Edwardian corset pattern from Atelier Sylphe.  You can tell it's Edwardian just by the beautiful swooping seams and gussets which are characteristic of this era.

One way to take your corsetry to the next level, is to sew as many historical patterns as possible.  I've got a stack to get through, some from old patents, some scaled up from books and some drawn by corsetiers who own antiques, such as this one from Atelier Sylphe.  This pattern is from the period c.1902-1905 and therefore an early Edwardian corset -  my favourite style because of the curved seams, flat front and beautiful hip shaping of that era.

Atelier Sylphe
Atelier Sylphe patterns come with some very basic instructions and a ton of pictures supplied electronically detailing every seam, every angle, every minute detail of the original antique corset, so that the experienced corset maker can figure out how to sew it together.  It's not as hard as it sounds once you get down to it, but I found that pinning the paper pattern complete with bone channel guidelines together first, acts as a great reference and guide to sewing the toile - you can make notes on it as you go so that you have a 'live' reference when you come to sew the final version.


Edwardian corsets are generally single layer garments with curved lapped seams, bust and hip gussets, and vertical bone channels sewn to the inside over the curved construction seams.


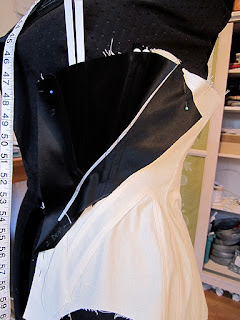
I made one calico toile, sewing each side together separately and making improvements each time.  I then collected some coutil scraps and made a section of the pattern to see how the design reacted to much stiffer fabric, and added a little piping experiment.  Quite happy with the results I cut the corset in coutil and made up one side with silver piping at the main curved seams.


Black satin coutil is extremely unforgiving - it shows up every single tiny mark, every pin prick, every crease, and to make matters worse, it is a devil to stitch - the glare of the shiny surface with black stitching is an eyeache.  

However, the result is extremely pleasing, and although hard on the eyes when stitching, satin coutil is very easy to sew and gives the corset a lovely crisp appearance and feel with a really beautiful lustre.


The piping is polyester - all I had in the correct colour.  I'm not convinced.  Will have to try silk fabric for the piping - it's thicker than polyester so the 'rope' pattern of the piping cord wont show through, and it will be less slippy to sew.  However the other reason i'm not sure about the piping is because of the way the boning channels must be sewn perpendicular to the curved seams and therefore over the piping at an almost 45 degree angle.  It might therefore be better to construct the corset in a different way which means that the vertical bone channels are sewn invisibly to a lining.


I do love this pattern.  The way it has been drafted is excellent - every line perfectly matched so that the corset, once you have worked it out, is actually really easy to sew.  The detail is fabulous, the shape lovely.     I'm going to sew the other side in a different style - closer to the original, without piping but with contrast stitching.

My blog posts will be quite intermittent over the next few weeks but I will keep you posted, and I do have a little giveaway to tell you about soon.


Friday, 4 November 2011

A little rant

This week on my Sew Curvy Facebook page, I wrote a 'status update' which I thought may be of interest to readers here too.  So I have expanded upon it a little and added a video to demonstrate the problem.

The corset on the left is by Electra Designs, the one on the right is a cheap chinese rip off.  See what corsetiere Alexis Black had to say about it on her Facebook page by clicking here.
Corset design and image theft is a big problem in the independent corsetiers world.  Individuals are constantly finding that their hard work has been ripped off and copied by unscrupulous Chinese factories, and to add insult to injury the images which they have worked hard to create and probably paid a lot of money for, are used to promote these knock-off's at ridiculous prices.

From time to time, these big companies from China offer me wholesale corsets at knock down prices. USD5.00 each to be precise. Yes $5 for a corset.

This means that the manufacturing cost of these corsets is under $2.50 which works out at about GBP2.00 and €1.50. 


If that's how much it costs to manufacture a corset in China, can you then imagine the cost of the raw material - the busk, the bones, the fabric, eyelets and the lacing plus any embellishments? Perhaps we're talking $1.50? Which leaves less than $1 per corset for the people working in the factory!

These corsets retail in the West under brands such as "Corsets UK" and other similar sites,  for between £30-100 (€40-120/$50-150).  That's a heck of a mark up!

As I said, often the designs are copied from hard working independent corsetiers. The resulting fake product is not only cheap and nasty - literally, but the fit is ...well there isn't a fit. 

Corset busks from Germany
German steel is the best steel in the world, closely followed by British steel.  Most professionals use German steel busks in their corsets.  If you consider that one German steel busk fastner is more expensive wholesale than the cost of a whole corset made in China, you can easily see the reason why it's best to either make your own corset with quality supplies, or buy a bespoke or rtw corset from a reputable and independent corsetiere.  Infact, the cost of making a quality corset can quickly add up to £50+ for the raw materials depending on fabrics used.  The money you pay for a bespoke corset is made up of this cost plus the extreme care, attention, and time lavished on each piece by it's maker.  A plain corset can take 20 and more hours to make.


Once, I had a corset for sale in a shop where I happened to be working when a couple took an interest in the peice.  They saw the price tag of £200 and dropped it with a nervous giggle and a look which said "whoever made that is having a laugh".  I didn't say anything but I was aflame with indignation!  If I was paid just £10 an hour for the length of time it took me to make the corset - not including the cost of materials, it would have cost much more!  When you think that a good hairdresser is paid up to £50-60 an hour for their work, then please tell me why an equally skilled artisan is worth less per hour just becuase their work involves a needle and thread?

In corsetry, and other sewing related artistry,  you really do get what you pay for so here's a little film from Lulu and Lush to demonstrate what I mean.


And to all ladies who sew - we must never underestimate or undervalue our skill and the care and patience it takes to produce beautiful things with it.


Sunday, 9 October 2011

Corsets on the table


Furiously trying to finish my book in time for the November deadline.  I'm nearly there but finding it very hard to keep it simple and understandable for beginners, and yet inspirational for intermediates.  

Here is a double layered silk corset which is one of the corsets featured in the book, proudly modelled by one of Lucy's gorgeous girls.

This is what the boning looks like if you could see it
The next project for the book will be the same shape but using a different technique with different fabrics and embellisments.

Also on the table, I'll be making a corset for a friend soon, here are the ideas i've been playing with in scraps..


Thursday, 8 September 2011

Making a vintage bra pattern

I have often made reference to one of my favourite sewing books, the Odhams Encyclopaedia of Needlecraft which was published in 1954.  I think vintage sewing books offer information that is often these days, overlooked, ignored or covered up in favour of shortcuts, modern techniques or 'insider secrets'.

There are no secrets to good sewing - all the information is  'out there' somewhere.  The great couturiers of past years all learned at their mothers or grandmothers knees before fashion degrees and sewing schools ever existed.  The difference between them and  most of us, is that they are innovators.  A quote from the book "Waisted Efforts" by Robert Doyle explains: 

"Interestingly, as scholars research and analyze the techniques of master couturiers, it is often forgotten that the couturier is a master of sewing and cutting, that decisions are made depending on need, not formula.  Sewing after all, is simply a series of seams, some straight, some curved.  The crucial part is that the stitcher must become proficient at doing them."

Most practical sewing skills are available to learn in vintage sewing books and discussed in plain english - I've said it before and I'll say it again, reading a vintage sewing book is like sitting with your grandma and sewing together.

Back in January I posted some pages on how to make a bodice block.  Here is the next few pages - how to make a simple bra from the bodice block.  

Enjoy!


click to enlarge


Monday, 29 August 2011

Antique corset show and tell at Symingtons


The things which struck me most about the Victorian and Edwardian corsets in the Symington collection, was their lightness, their diversity and the innovation of those who made them.  

All of the corsets, how ever many bones or layers, were extremely lightweight.  Many, though not all, were also very stiff keeping their hourglass shape in their boxes even when laid flat.  This can probably be attributed to the manufacturing process where the finished corset would be strapped onto a copper dolly - like a dress form made of copper - pasted with cold starch and then heated via steam in the dolly.  This heat process would dry the corset into it's final moulded shape.  The thought of pasting one of my painstakingly made creations with cold starch makes me shudder!!!


Not all were stiff though and some would have to be laid flat or stretched out to see how their panels were shaped.  This one above from 1911, has the most beautiful curved panels - there are 4 on each side which are gussetted at the bustline to accommodate the bust.  The shaping of the bottom panel means that no gussets are required to accommodate the hips, while the very curved panel in the middle,  seems to support, or anchor, the structure of the corset.


The Victorians are known for their innovation and corsets are no exception.  Here is one with a slotted back system which is tightened by two straps which enclose the waist on the outside - the straps are pulled around the middle and fastened with a buckle to tighten the corset.  This design therefore does not require eyelets or laces - the usual method of back adjustment for corsets of this period.


The corsets were given structure by a number of materials in combination or otherwise - there were flat steel bones, spiral steel bones, whalebone, cane and cording - all of these different materials, in various different widths, gave different levels of support.  The bones - whatever they were made of, were extremely thin, lightweight and flexible.


These bones strapped to the back of one semi 'de-boned' corset, are made from thin cane with ends dipped in what looked like enamel paint.  They are so thin they are almost cardboard like!


The cording on the corsets was so fine and delicate, but made rigid panels!  It was made on special machines and then cut to shape.  The 'cords' were made from a number of materials from something called Coraline which was made from specially woven vegetable fibres, to paper, to hemp twine.


The insides of the corsets were neat and tidy - no raw edges here.  This is because all the seams were lapped, sometimes through several layers - a popular interlining was hessian.  Whether they were interlined or not, most of the corsets were made of either cotton coutil, lasting, or sateen for the outer fabric, and cotton twill for the lining.


There was little mention of this lovely fan lacing on the museum card attached to this corset.  Fan lacing was thought to add back support to the corset - it is tightened by a strap which buckles at the front.


There were a number of "tropical" or lightweight corsets on display proving that a very wide range of materials, techniques and designs were employed in corsetry.  The corset above was a favourite with many in our group, but the one below, invoked the most 'surprise' because it is made of cotton lawn - a material which would seem far too flimsy to make a firm foundation.


There were many different types of busk fastener on display - straight, conical, spoon, and 'unidentified'!  When the two piece front busk fastener was invented  it revolutionised corset wearing for ladies because being able to fasten/unfasten it at the front prior to lacing,  meant that they no longer needed help getting dressed in the morning.


Unlike our modern corsets today, the bones in Victorian corsets - metal or otherwise - were moulded into shape during the manufacturing process.


Last but not least, my very favourite corset style of the day was the deep plunge corset pictured at the top.  There was an identical style in our display room which was so dilapidated, it was difficult to examine.  Both examples are French and from the period between 1905-1910.  It seems like an utter contradiction to suggest that both look remarkably modern, but they really do!


One day I will try to recreate it
In un-corset related news, stay tuned this week when I have an AMAZING giveaway to tell you about.  It's from Dragonfly Fabrics - click the badge on my left hand side bar to have a guess at what they might be donating to your sewing cause.

All pictures (c) Julia Bremble and displayed with kind permission of Leicestershire County Council Museums Service Symington Collection

Thursday, 25 August 2011

Corsets as far as the eye could see

A trip to see the biggest antique corset collection in the world - The Symington collection!

All pics (c) Leicestershire County Council Museums Service Symington Collection


The past weekend was VERY exciting!  I am a member of an online resource called Foundations Revealed (see the bar at the bottom of this page), a webzine for corset and underwear enthusiasts.  Apart from lots of inspiring online articles, tutorials and advice, FR also arrange the odd "field trip" to museums in order that members can get 'up close and personal' not only with antique corsets, but also with other corset makers.  There's nothing like discussing your passion face to face with another interested party.


X-Ray of a steel boned Victorian Corset
And so Saturday past I joined in with the latest field trip to Snibston Discovery Centre which is the home of - amongst other things -  the magnificent and world renowned Symington Collection of Corsetry.    Here,  in a special room allocated to our group, we were allowed to examine, touch, photograph and take notes on a vast array of antique Victorian and Edwardian corsets laid out on tables just for us!  Amazing!  Talk about children being let loose in a sweetie shop - that's how we all felt!


There was also an Underwear Exhibition in the Fashion Gallery.  If you live near the Midlands it's well worth a visit.  Entry is free on Wednesday afternoons, and there apart from the vast collection of underwear through the ages on display, there are also some fantastic couture pieces from such luminaries as Dior, Westwood, Mugler, alongside historical pieces including this 1940's utility dress. The exhibition is set up to give an insight into how modern designers have been influenced by history and is one of the best fashion displays I have ever seen in any museum.


The fabric print here on this dress is scottie dogs and lamp posts!
I still have to jumble through my notes and pics from the day - there are so many!  I also have yet to sit down with the fabulous book, Foundations of Fashion,  by the vastly knowledgable Curator, Phillip Warren, who gave us a fantastic talk about the history of the collection - I am trying to find out where you would be able to buy this book outside of Snibston.  Here in the meantime,  are some links where pictures have already been uploaded.

Click HERE to go to the Foundations Revealed Flickr page full of pics from the day including pics from the underwear exhibition in the Fashion Gallery (free entry and on until May).

Click HERE to go to the Sew Curvy Corsetry Facebook Page which has lots of pictures and comments.

I intend to write much more about this, but today I have to get ready for my Introduction to Corsetry Workshop, taking place this weekend in Woodstock, Oxfordshire.  There are still 2 places left if you would like to join in!  


Wednesday, 17 August 2011

Vintage bullet bras - show and tell!

The other week a friend of mine sent a parcel with the note "I saw these at a vintage market and thought they might be the sort of thing you would like" .. I opened the package and promptly burst into tears of joy and happiness!  Look what was inside ...


Two 1950's  bullet bras!!  They are made from cotton and though constructed differently, have the same spiral stitching design on the cups.  I thought you all might like to have a closer look ...

The first is by "Gordonia of Nottingham".  Despite lots of interwebular searching, I can't find any information on this company except that they had offices in New York too.


I love the way that bullet bras are constructed.  They seem so easy to replicate - all the parts are very simple, no stretchy powernet, no complicated stitches, no underwires, just cotton, elastic, and shaping.  

This Gordonia bra has elastic under the cups at each side, which joins onto a cotton 'cradle' in the middle, and cotton 'wings' at either side which are also attached to the sides of the cups.


The side wings are the same shape and size on either side, but unlike modern bras, they do not meet in the middle.  I am guessing that this particular bra was for a lady with a very wide back.  As you can see, the working part of the strap is a long piece of wide elastic, which joins onto a cotton 'eye' tape with two adjustments.  The hook section joins onto the other wing and is neatly sew in, whereas the eye side is zigzagged onto the elastic and frayed at top and bottom - this leads me to believe that hook and eye tape was not as neatly finished (if at all) as it is these days.  


The inside of the bra cups are unfinished in that there is no lining to shield the breast from either the seams or the stitching - might be quite rough to wear!  Interestingly from a construction point of view, the seams inside the cup seem to be lapped because there are no raw edges visible at all and they are not bound over.  The construction of the cup is in three parts so there is a seam right across the middle, and then one going down to the cradle from the middle of each cup.  The top section of the cup is one piece. The shaping comes from darts placed in these seams.  Click HERE to read a post I wrote last year on the shaping of cups for a bullet bra inspired project.


The lower edge of the cup, on the inside, seams to be finished with cotton tape, and the top edge on the inside has a satin tape finishing the inside - the only 'luxury' apparent in this very 'everyday' bra.  

The straps are attached at the front by a small piece of elastic sewn in between the cup and top binding into a loop which carries two metal rings through which the bra strap passes.  These rings act as the method by which the straps are adjusted - the end is left loose (and unfinished!).  At the back, the straps are sewn into the bra strap at the edge of the 'wings'.


The second bra, is made by "Exquisite Form" and is a '34C'.  Although at first glance these bras look very alike, they are in fact quite different.


This one has the elastic in the middle of the cradle with a peepthrough hole above it, presumably by design but also to allow the a good stretch if needed.    Again the cradle attaches each side to the wings, which are in turn attached to wide elastic at the back with a wide hook and eye tape.  The hook and eye tape on this bra looks as if it is hand whipstitched.

The major difference with this bra is the cup design which is in 4 parts instead of three, so the seams form a 'cross' shape.  On the inside, the seams are not flat felled or lapped as there are raw edges apparent, but the cup is lined with tulle netting - or bobinette.  Presumably for comfort, but also perhaps to give the cups a little body.


Unlike the Gordonia bra, the bottom edges of the cup here are not bound with tape, nor are the side seams joining the cradle to the wings.  The top and bottom edges are finished with narrow cotton tape.  No luxury here but interestingly, the side seams do have a little strip of bobinette sewn over the top of them.  Fiddly!


The straps on this bra join on by a similar method, but no elastic, just a strip of material the same as the straps, sewn into the top of the bra holding a square metal slider as the mode of adjustment for these straps.  Again, the straps are sewn into the back of the bra.  


Now the straps ... I just love how these have been made!  The same on both bras and such a simple method. 


this is the inside


this is the outside
A simple strip of cotton, folded either side and then folded again to meet in the middle, and topstitched down.  That's it!  The stitched side - ie the side where the edges join, is on the outside of the bra.  Utalitarian and decorative all in one go.  My favourite!

I can't imagine that these bras were anywhere near as comfortable or supportive as todays bras, especially for the bigger busted lady, but I think they are gorgeous and I am definitely going to try and replicate them at some point in the not too distant future, perhaps with some beautiful light silk and maybe even a little padding in the cups to enhance the spiral stitching - like these dress cups I made a while ago in a similar style (click link above for full post).  


Retro style padded cups  - unfinished - I grew out of the dress before I finished it! :(


Monday, 8 August 2011

Another month whizzes by


I know you probably didn't notice, but I've been away again - my body in not so sunny Cornwall, but thanks to this wonderful book, my mind firmly in (very sunny) Mexico... sigh ...  If only!

Now back I have a ton of stuff to do this month, my book cover is due, I have 7 keen beans signed up for my corsetry workshop at the end of the month, and work continues apace with the corset I am making up for the step by step instructions to be included in my corsetry book (the publication date of which has now been postponed to Spring).  Here's a 'test' panel I made up to check my colour scheme and techniques.  It's a shame you can't see the colour properly - a beautiful ballet shoe pink.


This fabric is faux silk - I thought it was silk when I bought it years ago, and subsequently discovered with the benefit of experience*, that it is actually polyester dupion which annoyed me somewhat as I paid a silk price for it, hey ho.. ANYWAY, the benefit is that it is shiny on one side and dull on the other which I have worked into my design.  Every cloud has a silver lining.

I like the corset cording details here.

To test if a fabric is synthetic or natural, take a lighter to it.
If the frayed edge burns slowly, then it's natural, if it melts and bubbles, it's synthetic.
It's not really clear here, but the body is dull, and the external bone casings are shiny


It's taking shape nicely and I am loving sewing with this colour.

Do you find that sewing certain colours makes you more or less enthusiastic about a project?