Showing posts with label corsetry. Show all posts

Sunday, 15 April 2012

Spiral steel boning for dressmaking and corsetry

A while ago I wrote a post about how easy it is to use continuous spiral steel boning when making your couture style boned bodices and bombshell dresses, but I am still dismayed to see on blogs around the internet, that people are finding it hard to use and difficult to cut.

It's not hard, it's easy, and it's effortless, so please spread the word!

and if that doesn't convince you ...

Continuous spiral steel boning is much cheaper 
and more economical to use than pre-cut boning

Here's my tutorial again:

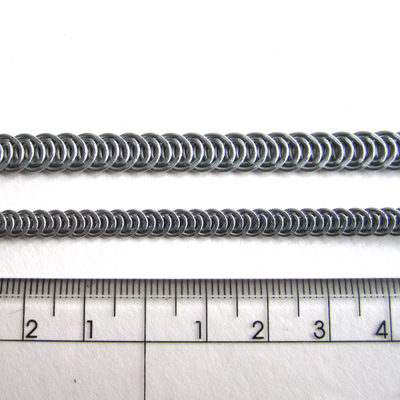
Spiral wire boning is used in corsets and in couture garments for strong boning support.  It is made of steel which has been formed into a continuous spring which has then been flattened.  Because spiral wire boning is a flattened spring, it is extremely flexible and can bend horizontally and vertically (backwards, forwards and sideways), making it perfect for boning over and around curves.

The curvy bone channel goes from side to side as well as up and over
In couture garments, it is used in conjunction with 2 layers of tulle or bobbinet which is a very fine and very strong netting material which when layered together, has no stretch but provides a fine, non bulky foundation for a gown.

a corset looks like a skeleton when held to the light
In corsetry, sprial wire boning is used in conjunction with coutil fabric and often in partnership with flat sprung steel bones which are not as flexible and therefore useful when a firmer, straighter support is required.  Both types of steel boning were invented during the Victorian age and used instead of whalebone because it was cheaper and easier.

Spiral wire boning comes in various different widths, from 4mm-15mm, and various different thicknesses making it possible to 'mix and match' your boning to achieve whichever level of support is required for any particular project.  For instance, you may only need a light 5mm wire to bone a net bodice, but you may need a more robust 7-10mm wire to bone a multi-layer corset for tightlacing.  With all boning, there is flexibility!


All types of boning, whether steel or plastic, comes either in pre-cut lengths or in continuous reels.  It is more economical and much more efficient to buy your steel in a roll and cut it yourself but many people are put off by the supposed requirement for 'brute force' with which to cut it. 

Do not fear!  

Spiral wire boning is easy peasy to cut and tip.  
Here is a tutorial to show you how.

To cut and tip spiral wire, you need a pair of wire cutters, and two pairs of pliers, one of which must have flat edges.

my flat pliers are out of shot!
To cut the boning, you need only snip either side of the wire.  When you have snipped the wire either side of the spring, it will come apart naturally.  


Trim any pokeyouty bits with your wire cutters and then apply a metal end cap and push it on so that it feels quite secure.


Now this is the fiddly part - using both pairs of pliers, you need to squish the end cap onto the wire simultaneously from either side and top and bottom.  Like this:

kindly modelled by Mr Marmalade
Now you have a tip which is compressed onto the end of your wire


BUT ... sometimes, if you make a mistake after inserting the bone into a channel and you need to pull the bone out, the cap can come off in the channel leaving you with a nasty conundrum.  To counter this, I use plumbers tape. It's cheap as chips and less messy than glue.  You just wrap a bit on the join between wire and cap, and this holds it all together perfectly and makes it all a bit smoother.  


Easy when you know how!

And if you're wondering where to buy some of this wonderful stuff ... click here:  Spiral Steel Boning


Monday, 2 April 2012

Corset making - 1911 Edwardian corset

One of the reasons I had to find a bigger workspace is so that I can concentrate more on my corset making business and have dedicated space to see clients for bespoke work.  As you know I'm doing corsetry and vintage inspired fashion.  My new space has enabled much ''freedom of mess'' which as you know is essential to the creative process - I can leave my stuff out  before I go to bed at night, and it's as it was where I left it in the morning .. Essential for not losing ones place in the process.


I've been  experimenting with design, so I took an Edwardian pattern from 1911,  from the book "Corsets and Crinolines" by Norah Waugh, and scaled it up according to the scale given.  The real life measurements are bust: 34, waist 24, hips 39.  I changed the hip gussets, added peplums to give a further illusion of hourglass shape, and took off the suspenders.


I used a reversible spotty Thai silk for the outer fabric, but the strength of this corset comes entirely from the coutil layer underneath the fashion layer.

This is an Edwardian style corset characterised by the curved seaming.  The bone channels are straight and usually would be sewn right over the curved seams (which are lapped) ... however, I don't want bone channel lines to spoil my nice curved lines, so i've hidden the bone channels in the coutil layer.

I'm quite pleased with this result and will be refining the design further in order to make some sort of wedding ensemble...


You can try this pattern yourself, by using one of Ralph Pinks scaled up patterns from the same source. Click HERE for more.


Wednesday, 25 January 2012

Bra recycling

I had this bra which didn't fit, but it had lovely lace details....


so I cut it up and saved the bits ...

 The straps, fastenings and underwires will eventually make another bra.  With the lacy bits, I decorated a corset...


The corset is especially made for the mannequin which came from Lucy.  I love how the bottom of the corset makes a pretty petal shape when fanned out like this ...


I have animal friends to help me!  A magnetised pin whale, and stork scissors..


I'm now inclined to look in charity shops for discarded bras with pretty lacy bits ...

Friday, 20 January 2012

Corsetry and dressmaking

Lordy, I just don't know how I manage to fill up my time so!!  Things on my table already for this year which I will be telling you about in due course ...

Corset making -  I am furiously sewing up show pieces for my new website.  The new designs have to be tested on a real person to ensure fit, proportion and line - the difficult part of this is finding a person with very 'average' measurements so that my fitting can be refined and further designs draped in a way that I know will fit real people.

flossing detail of a longline silk overbust corset with external bone casing
Dressmaking - I'm signed up to teach basic dressmaking over a 7 week evening course starting in May at the local sewing shop.   Working from home means I don't get out much and this chosen work means that even if I did get out, there aren't that many interested in what I do.  So teaching enthusiastic newbies the basics of dressmaking is good.  I've been asked to think of other courses in the line of lingerie and corsetry which could be held here so all is very exciting on that front.

Commissions - A friend from Edinburgh has seen a dress in a vintage shop that she wants me to copy.  She would have bought the original dress but it didn't fit - she is breast feeding, and will be for a while -  so not only does she need extra room up there, but she needs the dress to be altered when she stops.  The shop keeper was more than happy to let her take pics of details to send to me for replication so I am very happy to do this.

Details of the vintage dress
It's a beautiful dress.  Black wool crepe shift with cap sleeves, boatneck and a silk frill at the bottom with some beading and fringing details.  All of the materials we have bought - silk and wool crepe - are fair trade/organic/recyled/ethical which makes this project all the more lovely.  I've been concentrating on corsetry so much over the last year that I haven't made a dress for an age and this one is a lovely little commission -  a simple, classic, elegant design.  Ofcourse made with modern materials and with my own design details included it wont be an EXACT copy but one that will be utterly personal to my friend and hopefully treasured for a very long time.  Perhaps even in 70 years time, it will be admired in a shop window as a lovely vintage piece in it's own right.  We can dream eh?

I also have a ton of silk underwear projects to get through, some for my friend with the dress (above) and some for my mother in law - it's all compatible with my new line that I'll be showcasing over at my other website.

And as if that isn't enough (and it really isn't all), I really have to make some dresses for myself.  My weight has been fluctuating over the last 2 years but I've finally got a grip on the reasons for this and what to do about it!  Basically, as you get older, you can't eat chocolate and other 'rubbish' .. so it's new diet, new year, new wardrobe, new career ... I can't wait for 2012 to happen!

Monday, 21 November 2011

Complicated corsetry - antique patterns

I've been immersed in some complicated corsetry - setting myself challenges and working out designs.   This is a very beautiful Edwardian corset pattern from Atelier Sylphe.  You can tell it's Edwardian just by the beautiful swooping seams and gussets which are characteristic of this era.

One way to take your corsetry to the next level, is to sew as many historical patterns as possible.  I've got a stack to get through, some from old patents, some scaled up from books and some drawn by corsetiers who own antiques, such as this one from Atelier Sylphe.  This pattern is from the period c.1902-1905 and therefore an early Edwardian corset -  my favourite style because of the curved seams, flat front and beautiful hip shaping of that era.

Atelier Sylphe
Atelier Sylphe patterns come with some very basic instructions and a ton of pictures supplied electronically detailing every seam, every angle, every minute detail of the original antique corset, so that the experienced corset maker can figure out how to sew it together.  It's not as hard as it sounds once you get down to it, but I found that pinning the paper pattern complete with bone channel guidelines together first, acts as a great reference and guide to sewing the toile - you can make notes on it as you go so that you have a 'live' reference when you come to sew the final version.


Edwardian corsets are generally single layer garments with curved lapped seams, bust and hip gussets, and vertical bone channels sewn to the inside over the curved construction seams.


I made one calico toile, sewing each side together separately and making improvements each time.  I then collected some coutil scraps and made a section of the pattern to see how the design reacted to much stiffer fabric, and added a little piping experiment.  Quite happy with the results I cut the corset in coutil and made up one side with silver piping at the main curved seams.


Black satin coutil is extremely unforgiving - it shows up every single tiny mark, every pin prick, every crease, and to make matters worse, it is a devil to stitch - the glare of the shiny surface with black stitching is an eyeache.  

However, the result is extremely pleasing, and although hard on the eyes when stitching, satin coutil is very easy to sew and gives the corset a lovely crisp appearance and feel with a really beautiful lustre.


The piping is polyester - all I had in the correct colour.  I'm not convinced.  Will have to try silk fabric for the piping - it's thicker than polyester so the 'rope' pattern of the piping cord wont show through, and it will be less slippy to sew.  However the other reason i'm not sure about the piping is because of the way the boning channels must be sewn perpendicular to the curved seams and therefore over the piping at an almost 45 degree angle.  It might therefore be better to construct the corset in a different way which means that the vertical bone channels are sewn invisibly to a lining.


I do love this pattern.  The way it has been drafted is excellent - every line perfectly matched so that the corset, once you have worked it out, is actually really easy to sew.  The detail is fabulous, the shape lovely.     I'm going to sew the other side in a different style - closer to the original, without piping but with contrast stitching.

My blog posts will be quite intermittent over the next few weeks but I will keep you posted, and I do have a little giveaway to tell you about soon.


Friday, 4 November 2011

A little rant

This week on my Sew Curvy Facebook page, I wrote a 'status update' which I thought may be of interest to readers here too.  So I have expanded upon it a little and added a video to demonstrate the problem.

The corset on the left is by Electra Designs, the one on the right is a cheap chinese rip off.  See what corsetiere Alexis Black had to say about it on her Facebook page by clicking here.
Corset design and image theft is a big problem in the independent corsetiers world.  Individuals are constantly finding that their hard work has been ripped off and copied by unscrupulous Chinese factories, and to add insult to injury the images which they have worked hard to create and probably paid a lot of money for, are used to promote these knock-off's at ridiculous prices.

From time to time, these big companies from China offer me wholesale corsets at knock down prices. USD5.00 each to be precise. Yes $5 for a corset.

This means that the manufacturing cost of these corsets is under $2.50 which works out at about GBP2.00 and €1.50. 


If that's how much it costs to manufacture a corset in China, can you then imagine the cost of the raw material - the busk, the bones, the fabric, eyelets and the lacing plus any embellishments? Perhaps we're talking $1.50? Which leaves less than $1 per corset for the people working in the factory!

These corsets retail in the West under brands such as "Corsets UK" and other similar sites,  for between £30-100 (€40-120/$50-150).  That's a heck of a mark up!

As I said, often the designs are copied from hard working independent corsetiers. The resulting fake product is not only cheap and nasty - literally, but the fit is ...well there isn't a fit. 

Corset busks from Germany
German steel is the best steel in the world, closely followed by British steel.  Most professionals use German steel busks in their corsets.  If you consider that one German steel busk fastner is more expensive wholesale than the cost of a whole corset made in China, you can easily see the reason why it's best to either make your own corset with quality supplies, or buy a bespoke or rtw corset from a reputable and independent corsetiere.  Infact, the cost of making a quality corset can quickly add up to £50+ for the raw materials depending on fabrics used.  The money you pay for a bespoke corset is made up of this cost plus the extreme care, attention, and time lavished on each piece by it's maker.  A plain corset can take 20 and more hours to make.


Once, I had a corset for sale in a shop where I happened to be working when a couple took an interest in the peice.  They saw the price tag of £200 and dropped it with a nervous giggle and a look which said "whoever made that is having a laugh".  I didn't say anything but I was aflame with indignation!  If I was paid just £10 an hour for the length of time it took me to make the corset - not including the cost of materials, it would have cost much more!  When you think that a good hairdresser is paid up to £50-60 an hour for their work, then please tell me why an equally skilled artisan is worth less per hour just becuase their work involves a needle and thread?

In corsetry, and other sewing related artistry,  you really do get what you pay for so here's a little film from Lulu and Lush to demonstrate what I mean.


And to all ladies who sew - we must never underestimate or undervalue our skill and the care and patience it takes to produce beautiful things with it.


Sunday, 9 October 2011

Corsets on the table


Furiously trying to finish my book in time for the November deadline.  I'm nearly there but finding it very hard to keep it simple and understandable for beginners, and yet inspirational for intermediates.  

Here is a double layered silk corset which is one of the corsets featured in the book, proudly modelled by one of Lucy's gorgeous girls.

This is what the boning looks like if you could see it
The next project for the book will be the same shape but using a different technique with different fabrics and embellisments.

Also on the table, I'll be making a corset for a friend soon, here are the ideas i've been playing with in scraps..


Thursday, 25 August 2011

Corsets as far as the eye could see

A trip to see the biggest antique corset collection in the world - The Symington collection!

All pics (c) Leicestershire County Council Museums Service Symington Collection


The past weekend was VERY exciting!  I am a member of an online resource called Foundations Revealed (see the bar at the bottom of this page), a webzine for corset and underwear enthusiasts.  Apart from lots of inspiring online articles, tutorials and advice, FR also arrange the odd "field trip" to museums in order that members can get 'up close and personal' not only with antique corsets, but also with other corset makers.  There's nothing like discussing your passion face to face with another interested party.


X-Ray of a steel boned Victorian Corset
And so Saturday past I joined in with the latest field trip to Snibston Discovery Centre which is the home of - amongst other things -  the magnificent and world renowned Symington Collection of Corsetry.    Here,  in a special room allocated to our group, we were allowed to examine, touch, photograph and take notes on a vast array of antique Victorian and Edwardian corsets laid out on tables just for us!  Amazing!  Talk about children being let loose in a sweetie shop - that's how we all felt!


There was also an Underwear Exhibition in the Fashion Gallery.  If you live near the Midlands it's well worth a visit.  Entry is free on Wednesday afternoons, and there apart from the vast collection of underwear through the ages on display, there are also some fantastic couture pieces from such luminaries as Dior, Westwood, Mugler, alongside historical pieces including this 1940's utility dress. The exhibition is set up to give an insight into how modern designers have been influenced by history and is one of the best fashion displays I have ever seen in any museum.


The fabric print here on this dress is scottie dogs and lamp posts!
I still have to jumble through my notes and pics from the day - there are so many!  I also have yet to sit down with the fabulous book, Foundations of Fashion,  by the vastly knowledgable Curator, Phillip Warren, who gave us a fantastic talk about the history of the collection - I am trying to find out where you would be able to buy this book outside of Snibston.  Here in the meantime,  are some links where pictures have already been uploaded.

Click HERE to go to the Foundations Revealed Flickr page full of pics from the day including pics from the underwear exhibition in the Fashion Gallery (free entry and on until May).

Click HERE to go to the Sew Curvy Corsetry Facebook Page which has lots of pictures and comments.

I intend to write much more about this, but today I have to get ready for my Introduction to Corsetry Workshop, taking place this weekend in Woodstock, Oxfordshire.  There are still 2 places left if you would like to join in!  


Wednesday, 17 August 2011

Vintage bullet bras - show and tell!

The other week a friend of mine sent a parcel with the note "I saw these at a vintage market and thought they might be the sort of thing you would like" .. I opened the package and promptly burst into tears of joy and happiness!  Look what was inside ...


Two 1950's  bullet bras!!  They are made from cotton and though constructed differently, have the same spiral stitching design on the cups.  I thought you all might like to have a closer look ...

The first is by "Gordonia of Nottingham".  Despite lots of interwebular searching, I can't find any information on this company except that they had offices in New York too.


I love the way that bullet bras are constructed.  They seem so easy to replicate - all the parts are very simple, no stretchy powernet, no complicated stitches, no underwires, just cotton, elastic, and shaping.  

This Gordonia bra has elastic under the cups at each side, which joins onto a cotton 'cradle' in the middle, and cotton 'wings' at either side which are also attached to the sides of the cups.


The side wings are the same shape and size on either side, but unlike modern bras, they do not meet in the middle.  I am guessing that this particular bra was for a lady with a very wide back.  As you can see, the working part of the strap is a long piece of wide elastic, which joins onto a cotton 'eye' tape with two adjustments.  The hook section joins onto the other wing and is neatly sew in, whereas the eye side is zigzagged onto the elastic and frayed at top and bottom - this leads me to believe that hook and eye tape was not as neatly finished (if at all) as it is these days.  


The inside of the bra cups are unfinished in that there is no lining to shield the breast from either the seams or the stitching - might be quite rough to wear!  Interestingly from a construction point of view, the seams inside the cup seem to be lapped because there are no raw edges visible at all and they are not bound over.  The construction of the cup is in three parts so there is a seam right across the middle, and then one going down to the cradle from the middle of each cup.  The top section of the cup is one piece. The shaping comes from darts placed in these seams.  Click HERE to read a post I wrote last year on the shaping of cups for a bullet bra inspired project.


The lower edge of the cup, on the inside, seams to be finished with cotton tape, and the top edge on the inside has a satin tape finishing the inside - the only 'luxury' apparent in this very 'everyday' bra.  

The straps are attached at the front by a small piece of elastic sewn in between the cup and top binding into a loop which carries two metal rings through which the bra strap passes.  These rings act as the method by which the straps are adjusted - the end is left loose (and unfinished!).  At the back, the straps are sewn into the bra strap at the edge of the 'wings'.


The second bra, is made by "Exquisite Form" and is a '34C'.  Although at first glance these bras look very alike, they are in fact quite different.


This one has the elastic in the middle of the cradle with a peepthrough hole above it, presumably by design but also to allow the a good stretch if needed.    Again the cradle attaches each side to the wings, which are in turn attached to wide elastic at the back with a wide hook and eye tape.  The hook and eye tape on this bra looks as if it is hand whipstitched.

The major difference with this bra is the cup design which is in 4 parts instead of three, so the seams form a 'cross' shape.  On the inside, the seams are not flat felled or lapped as there are raw edges apparent, but the cup is lined with tulle netting - or bobinette.  Presumably for comfort, but also perhaps to give the cups a little body.


Unlike the Gordonia bra, the bottom edges of the cup here are not bound with tape, nor are the side seams joining the cradle to the wings.  The top and bottom edges are finished with narrow cotton tape.  No luxury here but interestingly, the side seams do have a little strip of bobinette sewn over the top of them.  Fiddly!


The straps on this bra join on by a similar method, but no elastic, just a strip of material the same as the straps, sewn into the top of the bra holding a square metal slider as the mode of adjustment for these straps.  Again, the straps are sewn into the back of the bra.  


Now the straps ... I just love how these have been made!  The same on both bras and such a simple method. 


this is the inside


this is the outside
A simple strip of cotton, folded either side and then folded again to meet in the middle, and topstitched down.  That's it!  The stitched side - ie the side where the edges join, is on the outside of the bra.  Utalitarian and decorative all in one go.  My favourite!

I can't imagine that these bras were anywhere near as comfortable or supportive as todays bras, especially for the bigger busted lady, but I think they are gorgeous and I am definitely going to try and replicate them at some point in the not too distant future, perhaps with some beautiful light silk and maybe even a little padding in the cups to enhance the spiral stitching - like these dress cups I made a while ago in a similar style (click link above for full post).  


Retro style padded cups  - unfinished - I grew out of the dress before I finished it! :(